Saturday, October 17, 2015

Pantry Reveal

One of the best things we changed during this renovation was removing a small half bathroom and coat closet by the foyer and kitchen and converting it to a pantry. There is another bathroom around the corner from the foyer, so the powder room was not necessary -- a pantry was.

This is what we started with:


Beginning the demo:


Framed up. You can see to the far right where we removed the coat closet to make the foyer larger:


And now our already hard-working pantry:


I added mirrored doors for two reasons: 1) Privacy. I don't want a clear view into the pantry all the time. 2) Reflection of light. Directly across from these doors are our patio french doors, so it was the perfect opportunity to double the light in the room.


 I am realistic enough to realize that the pantry will probably never look this good again, but I guess I'll enjoy it while I can... ;)


Thursday, October 15, 2015

Foyer

Our foyer/entry is also pretty much finished. It isn't even worth showing you the before picture, because it was just a big blank wall when you first walked in the door. It definitely was not the selling point of the home when we first toured it. It actually was kind of jarring. So, while we couldn't remove this wall (pretty much the only one we didn't remove), I decided to make it a feature wall. ("If you can't beat 'em, join 'em".) 


Luke and I added picture moulding to add dimension and painted the entire wall a dark charcoal gray to add a little drama and help the wall recede somewhat. My giant mirror that I've had since our first house and that every time we move I expect to find cracked in the box, survived and makes this space feel a bit larger.


Because this space is narrow, I decided instead of a console table, I would do a narrow shelf under the mirror. I made this using a common pine board from Home Depot that I put a "faux live edge" on the front and distressed and stained it.


 I found this vintage coat hanger and fell in love. It is unexpected and perfectly functional. I have noticed in the past that whenever we have a coat closet in the entry, no one uses it. The coats and shoes just get piled by the door anyway. So, with the coat hanger and bench in plain sight, I hope it will be an invitation for our guests to use it.


Luke has jokingly named them "Elmer and Gluestick". 

Another thing that helped this tight space feel a little bit more inviting was the lighting. We added 4 extra lights: 2 sconces and 2 pendant lights. It has made ALL the difference. 


This room was a challenge at first, but now it is one of my favorite little spots.

Living Room and Kitchen progress photos coming soon!

Tuesday, October 13, 2015

Dining Room 99% Done

FINALLY, we can almost say we have a room done. Almost one year exactly from when we first began construction on this house. If someone had told me it would take an entire year...I'm not sure I would have signed up for this. BUT, being on THIS side of it now, I guess it has been worth it. ;)

Our dining room is finished except I'm waiting on a piece of art from my uncle (a watercolor artist) to finish it off.

We are loving the fact that we have a place to eat upstairs again. There are a lot of things I took for granted, and that is one of them. No more. At least not for a while. Cooking upstairs and then packing all the food, dishes, glasses, etc. downstairs each meal got old really quickly. And the clean-up? Even worse. So, now that the dining room is right next to the kitchen, it is heaven.


We finally have had cool enough weather that Luke was willing to go up in the attic to install a junction box for the chandelier. I LOVE the chandelier. Thanks, Mom.
My sister helped me install the wallpaper a few weeks ago and I'm so pleased with it. The color is great, but what I love most about it is the texture. Anyone who comes over has to touch it because it is so interesting. It added the layer of coziness I was after.

The table finally went on sale for 20% off and I had an extra 10% coupon, so we pulled the trigger. No regrets. It is definitely the heaviest table I have ever lifted -- we even had to call a neighbor to help us get it in the house -- so it is not budging. And maybe will stay with the house if we ever move. ;)

The chairs were a Craigslist find a couple of years ago that I sprayed white and reupholstered in a gray "pleather" because let's face it, fabric wouldn't last a week with a 5 year old and 2 year old. So far they have held up great.


Wednesday, August 19, 2015

Dining Room Built-ins

Our Dining Room has seen some great progress in the last few weeks. We finally got our built-ins completely done.
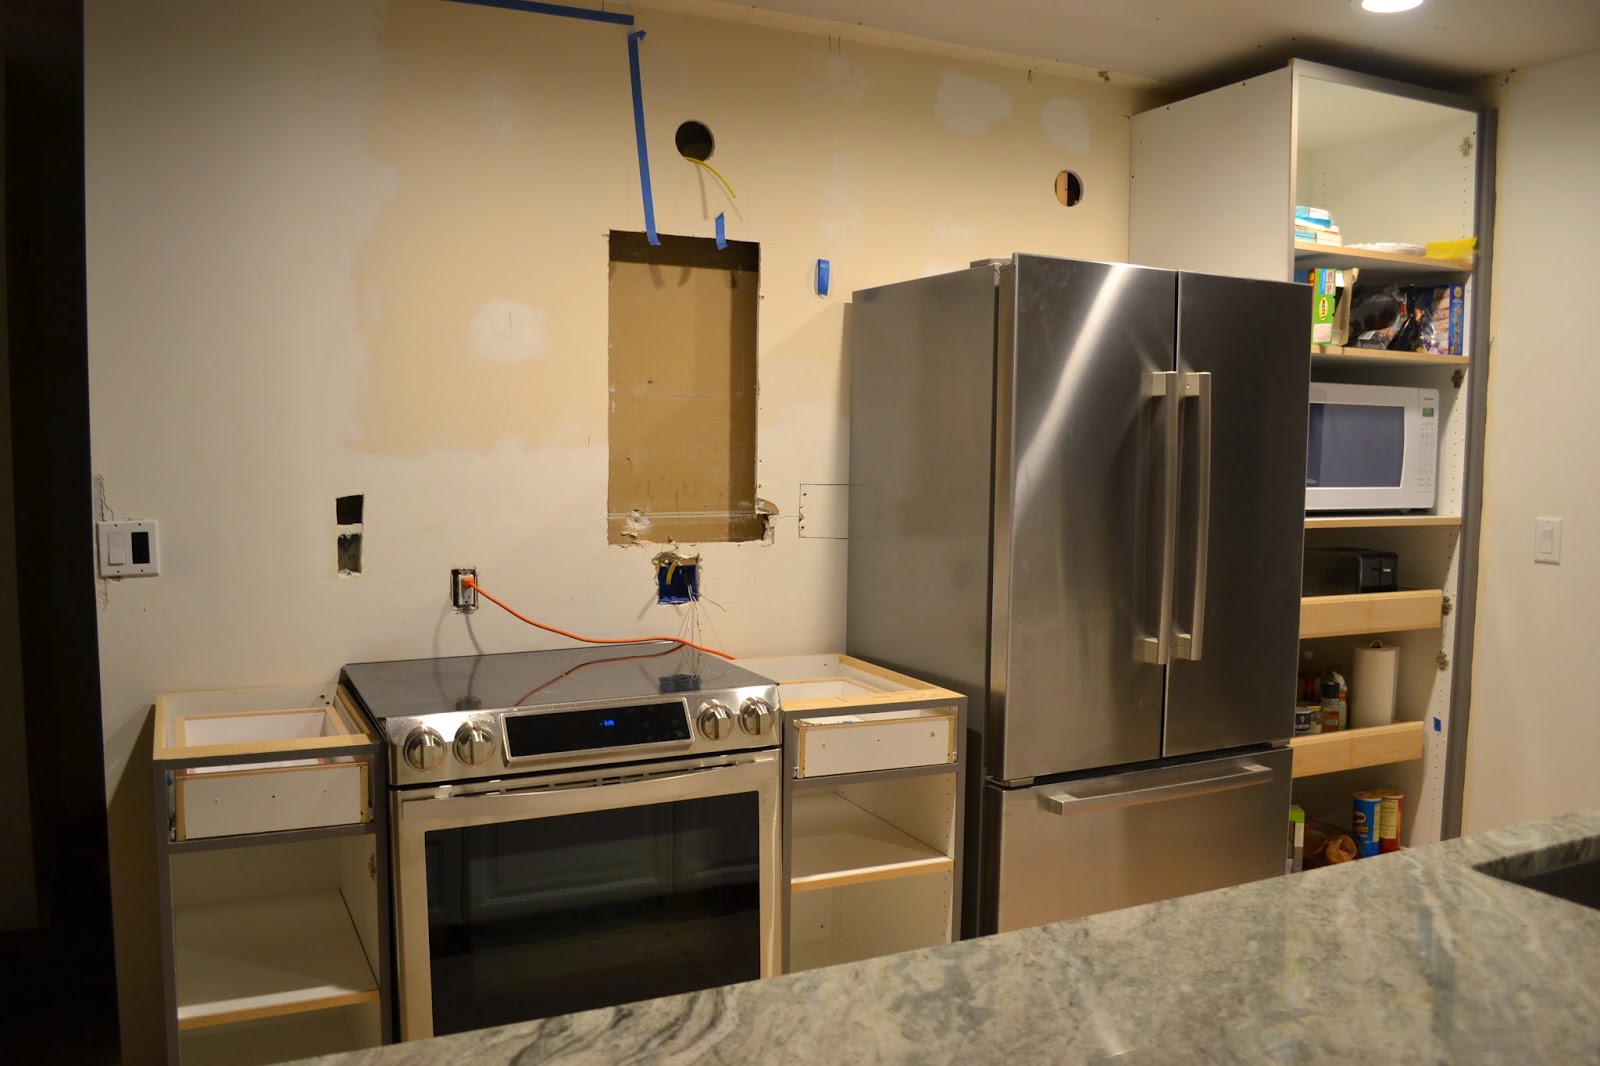
As a reminder, here's what we started with:


Gotta love that green carpet!

After (a whole lotta work...) ;)


Here's a breakdown of what we did:

* New floors (obviously)

* Whitewashed the brick -- There are a million tutorials online for how to do this. I ended up doing two light coats of watered down white latex paint because the orange brick color was still pretty strong after the first coat was done.

* Removed about 80% of the trim on the existing bookcases. -- Most of it wasn't the style we were going for, especially the fluted trim. It was a little too fancy, so I wanted to make it just a little bit  simpler.

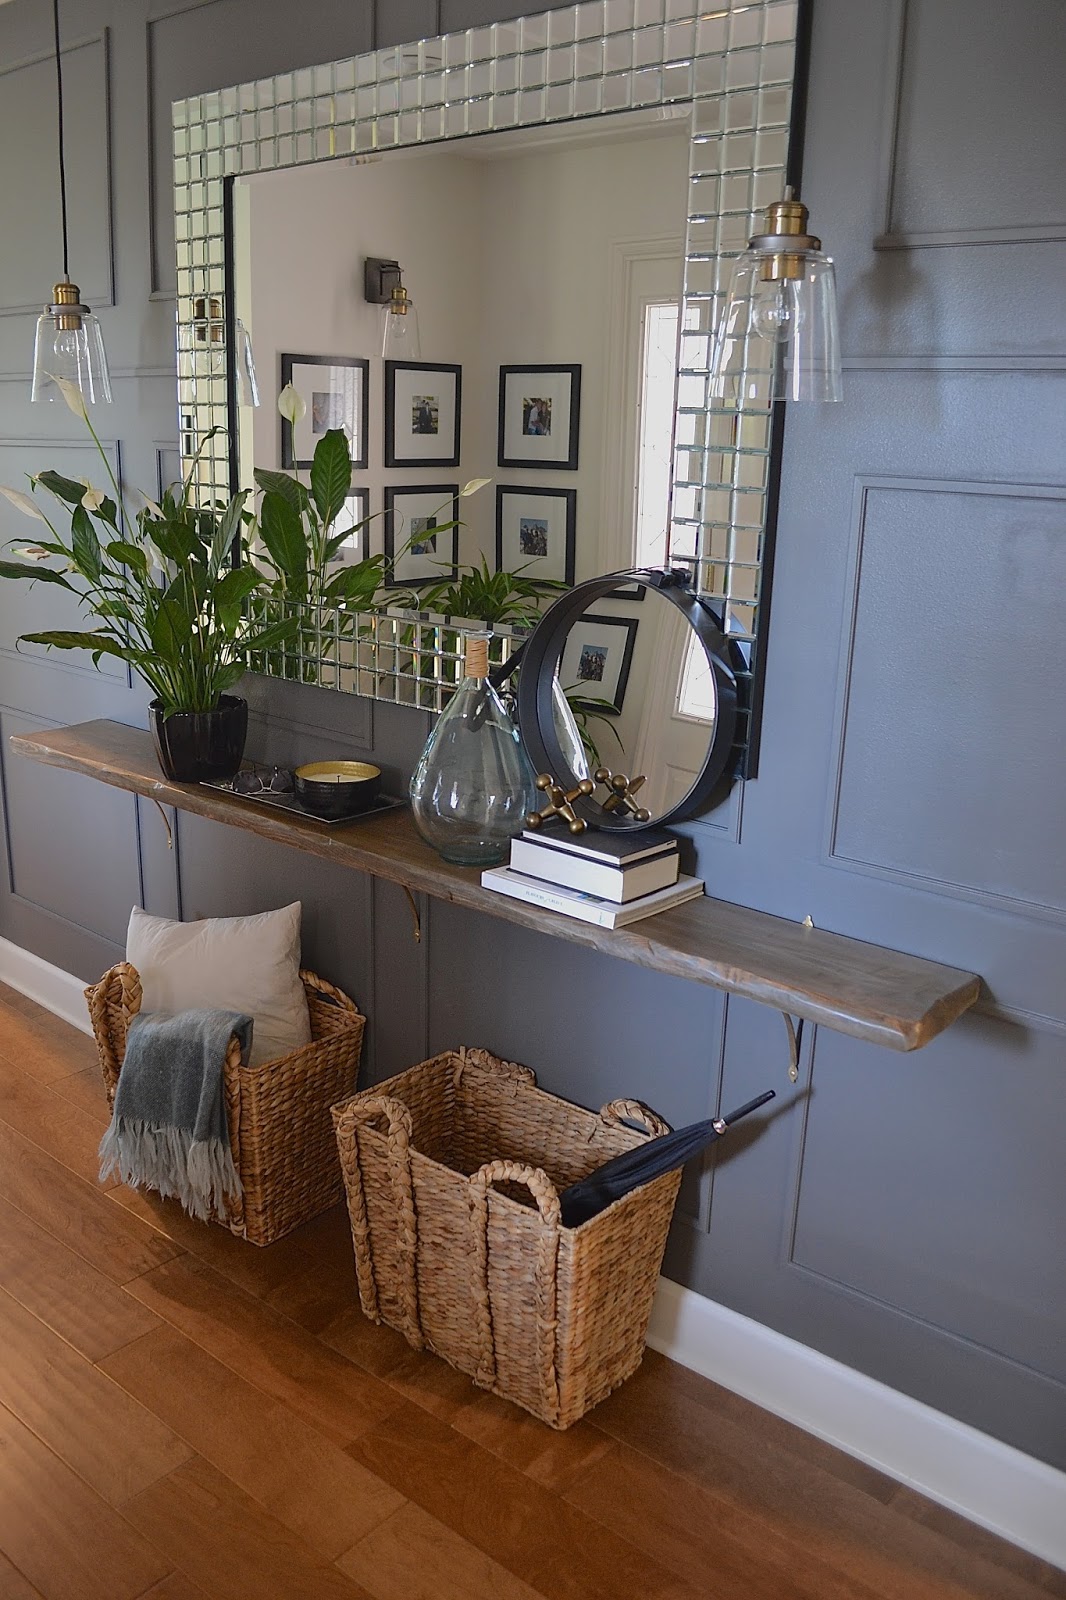
* Installed mirrors in the back of the bookcases. -- When we decided to make this room the dining room instead of a formal living room, I thought it would be fun to make these existing bookcases have a "china cabinet" or "hutch" feel to them. The mirrors help create that look. It also helps brighten this room up quite a bit because it is the only room on the main floor that doesn't have a bunch of windows.

* Stained shelves and top of the cabinet. -- I wanted to warm up this wall a bit with some stained wood, otherwise I was afraid it would end up way too white. I really like the contrast and it helps the dishes and things stand out a lot more than if it were all white.

* New trim and several coats of paint. -- We installed the new trim and gave everything but the shelves a nice bright coat of white.

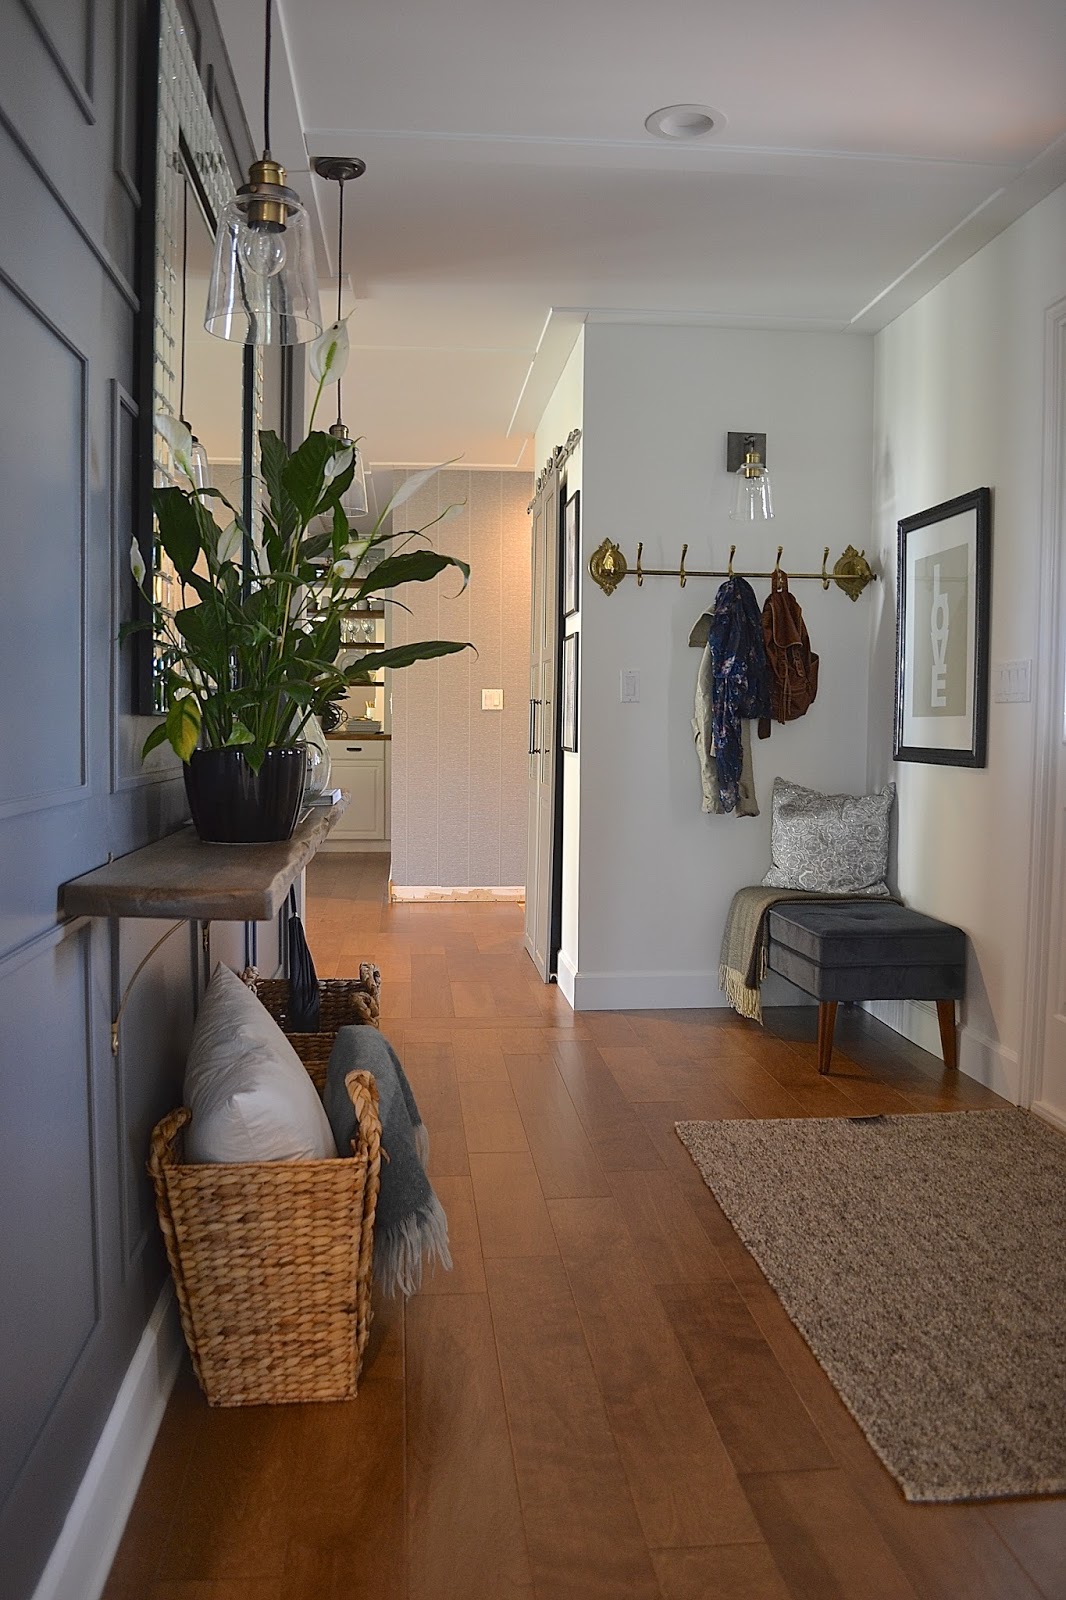
* Unpacked some of the boxes that have been waiting to be opened for over a year so I could style these new shelves. :)

I am pretty fickle when it comes to styling, so next week it will probably look completely different, but for now it was nice to have some fun playing around with some different looks.

So, the Dining Room is ALMOST finished. But we have a few things left to do.

* Baseboards. You probably noticed we're lacking these. This is the case everywhere, so this is towards the top of the list right now.
* Add electrical box for chandelier. I have a chandelier my mom gave me for Christmas last year that is just waiting to get installed. Can't wait to see it!
* Decorative elements:
I put together a little design board of my plan


* Wallpaper: I'm planning to install this pinstripe wallpaper on the walls to give the dining room a cozy feel and a some subtle texture. 
*Lighting: The chandelier is the aforementioned one that has sat in a box for 8 months. 
*Chairs: The chairs pictured here are similar to ones that I already have. I picked up some vintage ones for a steal on Craigslist a couple of years ago and I painted them white and reupholstered the seats. 
* Table: The table is the only thing we don't have yet. This one is what I have in mind. I found one very similar to this at a local furniture outlet store, so I think that is what we'll do. I've got to save up for it first. :)

So. That is our dining room. We're getting close.

Monday, July 13, 2015

Progress

Summer has hit and our lives have gotten busy -- which means that progress on the house has not been a quick as we'd like.
But, we've been working hard on our floors and we're getting close to finishing the main area. We'll still have to install them in the pantry, hallway and on the stairs, but the majority of the first floor will be finished. Again, another whew!
Luke's parents have been in town this weekend/week, and they've been a huge help. We got all the shelves installed in the pantry  --


We still have a few things to finish before I can actually start using it -- finish trim on the shelves, install a cabinet below the bottom shelf, floors and of course, install the doors -- but, it is turning out pretty much as I imagined. It is much-needed storage, so I'm antsy to get it finished asap!

Luke's parents have also been working extremely hard on getting our backyard shaped up. It has been neglected for years, so the work involved was pretty overwhelming. Especially considering the mess we've been making inside. :) But, they've helped us clear out all the weeds, unwanted plants and even helped us level out a huge part of the backyard that we wanted to turn into more grass for the kids. Tonight we seeded it and now we just start praying that it grows...

Hopefully I'll have some "after" pictures soon of the yard, but mostly of the inside. We've got quite a long list of things that have to be done before we can say it is "finished" but we're getting there. My goal is to be done by Seth and Luke's birthdays at the end of August. But, we'll see. I always under-estimate how long a project is going to take...

Monday, June 1, 2015

Ceiling Finished!


After months of working on our ceiling, it is finally done. Whew! Can we get a hallelujah?? We'd better enjoy it in this house because...never again! (famous last words...)
It was probably one of the most time consuming and uncomfortable (neck and back aches for days) projects we've taken on during this whole renovation. BUT, I think worth it. It makes the whole main floor look so much more updated.
I am so excited to get all the lighting installed soon. I've had a chandelier ready for the dining room since Christmas. It has just been sitting in its box, wondering if it will ever get a chance to shine. Soon, I promise.

Our next project is the floors. We started them a few months ago in order to get the stair railings installed, but now we can get them all done. For me, getting the floors installed will be the signal that it is the beginning of the end. Hooray! We're getting close!

Thursday, April 30, 2015

Back wall plans

So, in my last post, I mentioned that we were talking about switching up our back wall configuration a little bit. The original plan was to stick the refrigerator on the end of the wall and then have the range and flanked by two lower cabinets between that and the tall pantry. I liked this plan because of the symmetry -- two floor-to-ceiling cabinets on either end with a range feature wall in the center.

But, when we sold our old refrigerator and that spot was open, it felt so much better! It was essentially removing a 2 1/2 foot wall on the end of the kitchen. I began to think about that a little bit over the next couple of weeks, but I was reluctant to really commit to action because I still liked the symmetry with the refrigerator on the end and the tall pantry on the other end.

Last weekend, we had to move everything out of the way in order to work on the ceiling, so I figured when we put the refrigerator, range and lower cabinets back, we might as well just try the new idea -- mostly just because I couldn't stop thinking about it. Then, if we hated it, I'd finally get it out of my system.

Well, I didn't hate it. I loved it! It really does open up the kitchen a ton. When we walk in from the garage or even the entryway, it feels so much better. So, the reason that we were "in negotiations" (Luke and I) was because by moving the configuration again, Luke has to redo pretty much all the electrical and move the plumbing line for the pot filler. He's not thrilled.
But, one more reason I'm convinced this is the better configuration is because he's willing to do it now, after seeing the difference. ;)

So, here's my plan for the range wall now that it is on the outside part of the back wall. I don't want to do anything to lose the open feeling, so we have decided to nix upper cabinets. I know! No uppers. But, we have moved everything back into the kitchen and we don't need them anyway. Our plates and glasses, etc. are in the large drawers next to the dishwasher. Best idea ever. Unloading the dishwasher is so much faster. Pretty much everything that comes out of the dishwasher goes into those three large drawers and I can unload the entire thing in about a minute.

Here's the system:


 I put non-slide liners on the bottom of all the drawers and it keeps all the dishes in place really, really well. Luke was a bit skeptical at first when I told him my plan, but he's liking it now. No more hefting heavy stacks of plates and bowls up to a high cabinet.

Anyway, back to our plan for the back wall -- sorry, I got off on a tangent -- This is our new configuration as it is now:


Pretty rough, I know. But, the idea is there. This is my plan for what it will look like in the end:


The wood surrounding the lower cabinets illustrates our butcher block countertops with a "waterfall edge" -- meaning it runs down the sides of the cabinets as well. I've seen this done before -- mostly on islands though -- and I'm hoping it will look as good in reality as it does in my head. (That's always my hope!)
We've got a lot to do before we get to that point, but I think we're heading on the right track!

Wednesday, April 22, 2015

Dishwasher Panel

We finally got our dishwasher panel on last night. It was kind of a pain. Mostly because the template they supplied was incorrect and off about 11/16". That seems like a small amount, but it caused a lot of delay and frustration. But, we got it adjusted and remounted and thankfully, it all worked out in the end.


We also got our hardware installed on the island cabinets a few days ago, which means I can finally start moving our stuff back in. Hooray! Today marks the 8 week mark since we ripped out the old kitchen. 2 months without a kitchen! Whoa. It actually went pretty fast and wasn't as bad as I was expecting. I think mostly for two reasons: 1) We had a kinda-sorta kitchen in the basement.
Yes, this fancy setup:


And 2) It has been amazing to see the kitchen that I've had in my mind for months, become a reality. It definitely has been stressful at times (I've mentioned a few of the reasons why in my last post), but for the most part I've been fascinated by the process.

Right now we are in the process of tweaking our back wall arrangement a bit. I've been mulling over a new option for a couple of days and I'm currently still in negotiations with Luke. :) I'll keep you posted on what we decide to do...

Thursday, April 16, 2015

Island Cabinets


Whew, the island cabinets are all painted! I'm not going to lie, it wasn't an easy job, but it is SUCH an improvement.
I set up a spraying room in the basement (basically just taped up plastic on all the walls and the floor). Spraying definitely made the job easier, and I think the cabinets came out better. The sprayed finish is pretty much flawless.


We just have to install our hardware (that has been a saga and a story for another day...) and then we can move some of our kitchen stuff back upstairs. I can't wait! Running up and down the stairs for every little thing is getting quite annoying.

Oh, and our dishwasher won't look like that forever. We actually bought a dishwasher that is designed to have a cabinet front attached to it, so when it is installed, it looks like a cabinet instead of a dishwasher. I'm hoping we'll get to install that this week as well.


Thursday, April 2, 2015

Countertops are in!


Whew, after over a month without real countertops, ours were finally installed this morning -- and I'd say, it was worth the wait! They look even better than I'd hoped.

It is interesting. I can pick out materials and items for clients all day long, but when it comes time to commit for my own house, I am the worst of the worst of clients. I changed my mind countless times, visited pretty much every stoneyard in the area and even after making the commitment, agonized over whether or not I had made the right decision.

See, I've had in my head my dream kitchen for years. If you look at my Pinterest Kitchen boards you'll see the one thing that most of them have in common: Carrara Marble. It is absolutely beautiful in person. White and gray with stunning veining and movement. It isn't over-powering, but it definitely demands attention.

But, I cook -- a lot. I have kids.
Marble does not like either of those scenarios. It stains, etches and can even chip.

So, I had to get over my "dream kitchen" in my head and switch gears a bit. When I saw this quartzite, I was immediately intrigued. It was still a little busier than I'm usually attracted to, but it had incredible movement and "veining" instead of the splotches that granite typically has.
It also had some great colors to work with. Instead of just white and a light gray, it also has dark grays, black, a little brown and tan and even a slight grayish-green tone in some of the veins.
Bonus for Luke: it was A LOT cheaper than the marble I had fallen in love with. ;)

Now that it is in, I can make some more decisions about cabinet colors, hardware and lighting. It really is the jumping-off point for the entire kitchen -- now everything else should be a little easier to commit to. (Or so I'd like to tell myself.) I really am the worst client.


Friday, March 27, 2015

New Window

Our new huge window is finally installed and it makes all the difference. I had no idea how much it would change the look and feel of the whole kitchen -- and actually the whole main floor! I haven't had to turn on any lights during the day since this was installed! I love it.
(excuse the photos, it was surprisingly hard to get a decent photo)


We are almost green-laminate free! We installed a piece of our old countertop and the old sink temporarily so we had a semi-working kitchen until our new counters were installed. It will be a happy day when it is finally gone for good!
The new counters are scheduled to be installed on Tuesday -- hopefully we can be ready by then...We still have quite a bit to do.

Thursday, March 5, 2015

Kitchen Progress

We've got our cabinets mostly re-installed to the new configuration. We have two on the backside of the island that still need bases, but we're getting to those next. Ignore the old countertop and sink/faucet-- we decided it will be a few weeks before we have countertops, so something is better than nothing. I actually have a semi-functioning kitchen now! Although, the old faucet is leaking, so I'm trying to use it as little as possible. Thank goodness for a tiny bar sink downstairs! I'm going to try to never take for granted being able to wash dishes in a kitchen sink, or not having to run up and down the stairs for every little thing in order to cook a meal...
This is the latest on our layout:


Everything is still a total mess, but it is coming together bit-by-bit. We just got some quotes for a large window in the wall in front of the island. I can't wait for that! It will let in so much light! In my world, you can never have too many windows or too much light...
We're also trying to source some granite or quartzite for our island. I think we've narrowed it down to two options.

Luke is still going to have to get in the attic a couple more times to finish the electrical work, but for the most part, the utilities are finished. And as soon as we make a final choice for the stone, I can get started painting all the cabinets. I really like our cabinets, but with the floors that we are putting in, and the other finishes, the maple wood is turning very pinky-orange. Not going to work. So, I see weeks of painting in my future...Fun, fun...

Tuesday, March 3, 2015

Kitchen Demo

Yep, we did it. We tore into the one room that we really hadn't touched much during this renovation. The kitchen "makes or breaks" a house design in my opinion, so I really wanted to make sure it was right. After a lot of brainstorming and tweaking, I came up with a reconfiguration that would completely change the function and aesthetics of the kitchen, but we could use all of our existing cabinets -- major budget saver. It was a bit of a challenge to get Luke on-board, but he finally agreed that the new plan made a lot of sense. So, demo began!


This is our makeshift kitchen downstairs...yep, very classy.


Again, my brother-in-law was awesome and came to help us for the weekend. Between Luke and Brett, we were able to get all the plumbing moved and most of the electrical work finished. Because we are completely changing the configuration, we had to redesign the lighting plan. Good thing we are redoing the ceiling because currently, the ceiling looks like Wack-a-Mole with all the holes in it.


Yes, moving plumbing is a bit of a mess... Good thing the guys know what they are doing!


We're almost done reinstalling all the cabinets, so progress pictures are coming soon. The new layout is such a huge improvement!